How to Make Your Own Nut Butter at Home

Nut butter is a versatile and delicious spread that can elevate anything from toast to smoothies to baked goods. While store-bought versions are convenient, making your own nut butter at home allows you to control the ingredients, create custom flavors, and enjoy a fresher product. Plus, it’s surprisingly easy! Whether you're making peanut butter, almond butter, or any other type of nut butter, here's a simple guide on how to make it at home.
Why Make Nut Butter at Home?
Before we dive into the process, let's explore some of the reasons why homemade nut butter is worth the effort:
- No Added Preservatives or Sugar: Homemade nut butter lets you control what goes into it. You can skip added sugars, artificial preservatives, or unhealthy oils that are often found in store-bought varieties.
- Customization: You can tailor the texture and flavor to your exact preferences. Want it creamy or crunchy? Add a dash of honey or cinnamon? The choice is yours.
- Cost-Effective: Making nut butter at home is often cheaper than buying pre-made jars, especially if you buy nuts in bulk.
- Fresher Taste: Homemade nut butter is fresher, as it doesn’t sit on a shelf for months before reaching you.
What You’ll Need
The basic tools and ingredients for making nut butter are minimal, and you may already have most of them in your kitchen.
Equipment:
- Food processor (or high-powered blender)
- Spatula
- Measuring spoons (optional, for adding flavorings)
- A jar or container for storing your nut butter
Ingredients:
- Nuts (about 2 cups): The choice of nut is entirely up to you. Common options include peanuts, almonds, cashews, walnuts, or even mixed nuts. Raw or roasted nuts will work, though roasting brings out a richer flavor.
- Oil (optional): Some nut butters may need a little oil to help with consistency. Common choices are coconut oil, olive oil, or peanut oil, but this is optional if your nuts have enough natural oils.
- Salt (optional): A pinch of salt enhances the flavor and balances out the richness of the nuts.
- Sweeteners or flavorings (optional): Honey, maple syrup, or cinnamon can be added to customize your nut butter to your taste.
Step-by-Step Guide to Making Nut Butter
-
Roast the Nuts (Optional) Roasting your nuts is optional, but it can enhance the flavor. Preheat your oven to 350°F (175°C), spread your nuts in a single layer on a baking sheet, and roast for 10-15 minutes, or until they’re golden and fragrant. Be sure to stir them occasionally to prevent burning.
-
Prepare the Food Processor Once your nuts are ready (roasted or raw), allow them to cool for a few minutes if they’ve been roasted. Then, place them into the bowl of your food processor. If you’re using a blender, you can follow the same steps.
-
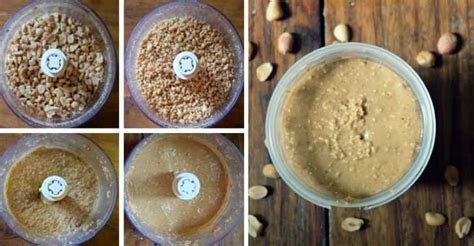
Start Processing Turn on the food processor and pulse the nuts for about 1-2 minutes. Initially, the nuts will break down into coarse crumbs. Scrape down the sides of the bowl as needed to ensure all the nuts are getting processed.
-
Keep Processing As you continue to process, the nuts will start to release their oils and turn into a paste. The texture will go from crumbly to smooth and creamy. Depending on the type of nut you’re using and how creamy you want your butter, this process could take anywhere from 5-15 minutes.
Tip: Be patient! It might seem like nothing is happening at first, but eventually, the oils will be released, and the nut butter will come together.
-
Add Oils or Sweeteners (Optional) Once the nut butter has reached your desired consistency, you can add a small amount of oil (about 1-2 teaspoons) if the mixture is too thick. For a sweeter or flavored nut butter, add a pinch of salt, honey, cinnamon, or any other spices you like.
Process the nut butter for another 30 seconds to fully incorporate these additions.
-
Check the Consistency If the nut butter is too thick, add a little more oil to reach your desired texture. If it’s too runny, let it process a bit longer. Taste and adjust the seasoning if necessary.
-
Store Your Nut Butter Transfer your freshly made nut butter into a clean jar or container. Seal it tightly and store it in the refrigerator for up to 2-3 weeks. The cold storage helps to preserve the freshness and prevent the nut butter from turning rancid.
Variations and Flavor Ideas
While the basic recipe is great on its own, you can easily mix things up with different nuts and flavors. Here are a few ideas for customization:
- Peanut Butter: Add a little honey or maple syrup for sweetness and a pinch of salt for balance.
- Almond Butter: Try adding a dash of cinnamon, vanilla extract, or a bit of coconut oil for extra flavor.
- Cashew Butter: Cashews have a naturally sweet flavor. You can make a creamier version by adding a bit of coconut oil and a sweetener of your choice.
- Mixed Nut Butter: Combine your favorite nuts—such as almonds, cashews, and walnuts—for a richer flavor and smoother texture.
Troubleshooting Tips
- Too Chunky? If your nut butter is too chunky, it likely needs more time in the processor. Let it run for a few more minutes to achieve a smoother consistency.
- Too Runny? Add a bit more nut or coconut oil to thicken it up.
- Hardening in the Fridge? If your nut butter hardens too much in the fridge, simply allow it to come to room temperature or warm it slightly before using.